Vortex Spitfire vs Burris 332

The Spitfire offers you durability when it comes to the design. You get the minimalism of a red/green dot with the separation of an engraved reticle. Furthermore, you get the simplicity of a red dot allowing you to get on target fast and at the same time present you a medium range solution available in one package. The fantastic thing is you get more than just a waterproof and shockproof construction; you get the ease of use with the top load battery access- what more can one ask for. Therefore, if you need a practical amalgam optical system with a swift acquisition of a red dot with magnification and strength of usual scopes the all in one unit is worth looking at. However, if you feel you need more convincing check out our Vortex Spitfire 3x review! You will be surprised how magnificent this piece of equipment is.

Vortex Spitfire 3x Review​

Vortex has been around for decades, and today many people are acquainted with the brand compared to Leopold. The Spitfire from Vortex is one excellent example of what the company has to offer, making it one of the best 3x Prism Scopes available to use in any condition.

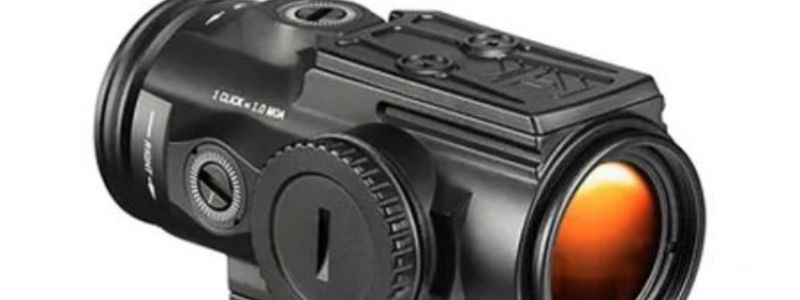
VORTEX SPITFIRE 3X PRISM SCOPE, EBR-556B (MOA) RETICLE – SPR-1303

Vortex Spitfire 3x Prism Scope, EBR-556B (MOA) Reticle - SPR-1303
Check Prices

You can purchase it in two magnification ranges the 1X and 3X option. Furthermore, the optics made for the AR platform made to use with 5.56 x 45 cartridges for rapid shooting at long and short ranges.

VORTEX SPITFIRE HD GEN II 5X PRISM RIFLE SCOPE, BLACK – SPR-500

Vortex Spitfire HD Gen II 5x Prism Rifle Scope, Black
Check Prices

Alternatively, it offers you a range reference between 0-500 yards, making it exceptional to use for hunting and shooting at the range. Not only is it made for different shooters the design is durable with the constructed single piece metal and integrated mount.

Another highlight is the reticles etched into the glass similar to a magnified optic and suitable for low-light target acquisition the same as a red dot. The scopes on the heavy side and weigh 12.2 ounce but worth it and will not bother you much.

If you have a strengthened core and physically powerful muscles, you will find using the Spitfire a breeze. While on the hefty side, it has a compact structure measuring 5.5-inches long with a height of 1.54-inches and has a 32mm objective lens.

Further, it has some convenience functions such as the red/green reticle option. With such a selection, you get the choice of using your preferred dot color. During the day, you can use the green shade with the red one at night making it versatile to use.

You get five adjustable brightness levels providing you with the best image no matter what lighting condition you find yourself. Even mounting the scope is fantastic as it has a low ⅓ co-witness 40.4 mm height.If you need a lower mounting height, all you need to do is remove the mounting riser.

Therefore, you get loads of functions making it a budget prism scope and whether it is worth the money all depends on how you plan to use it.

Specifications at a Glance:

The Spitfire 3x Prism Scope has a lot going, as you will see in the specs provided here:

Brightness:Adjustable in five increments
Eye Relief:2.8 inches
Field of View:31.5ft @ 100 yards
Graduation Adjustment:½ MOA
Magnification:3X (available in 1x as well)
Model:Fixed three-power magnified optic for ranges 0 – 500 yards
Parallax Setting:100 yards
Reticle:Battle crosshair optimized for the 5.56×45 caliber with a 55-grain bullet from your standard 16-inch barrel
Windage Adjustment:120 MOA

Features

While the specifications of the Vortex Spitfire Prism Scope are the best, it has some great features as well:

  • Fully Multi-Coated Lenses: With the multi-coated and anti-reflective coats, it helps reduce light dispersion and improves light transmission at the same time. You can see bright and crisp images with the air-to-glass surface and great for hunting or shooting at the range.
  • Durable Construction: The optic has a single-piece structure making the chassis lightweight and compact to make portability easier. The hard-anodized matte finish provides a low glare, especially when hunting.You do not want to startle off the game. Furthermore, it does not interfere with your performance when shooting.
  • Prism-Based Optic Structure: The prism-based design is a sharp optic with a unique reticle arrangement that is visible without using illumination. With the structure, it makes it a budget-friendly scope and versatile to use in array conditions and situation.
  • Fog Proof and Waterproof: You can use the scope in any environment from the sun to rain. With the nitrogen gas purging, you will have no fog forming internally in any temperature and operates within the -22° to +122°F range. Furthermore, the Vortex Spitfire 3X has an o-ring seal to keep out debris, dust, and moisture.
  • Shockproof: The rugged construction can withstand any shock on impacts when falling or recoil shock. Therefore, it is one of the best riflescopes to have and will not lose its zero easily when used in any terrain.

What Makes the Vortex Spitfire Prism Scope Unique?

One thing’s certain the Spitfire Prism Optic is a great performer in any condition. The sight mounts well with the factory mount providing you the versatility to use with different platforms.

For some shooters, the reticle might appear cluttered and complicated, but once you adjust it to suit your needs, you will quickly be pleased with the results.

You can use it for long and short distance sighting alike, in low to high levels of light, and in most weather conditions and terrains. Furthermore, you get the strength of the best red dot and scope in one. To top it all the Spitfires made for different shooters from 3-gun competitors to the LEO community.

You will be able to get fast target acquisition in CQB and move to medium-range shots without the need of adjusting the magnification.

The scopes simplicity offers you fixed magnification to help with a flat learning curve while farmers and landowners will love the fast target for keeping their land safe from predators.

Home defenders will enjoy the variable dot color options, rugged durability, and rapid target acquisition. No matter what type of shooter you are you will love this Prism Scope for its functionality and performance no matter what situation you find yourself.

Spitfire 3x Strengths

  • You get quality reticle performance as it offers an excellent and guaranteed brightness in any setting you use. The crosshairs etched into the glass,and you do not need to use a BDC or simple rangefinder with it.
  • The prism scope is efficient to use,and a great performer as the lenses are crystal clear and the overall constructions durable to withstand anything indoors and outdoors.
  • Comprise a red dot to get on target fast and offers you a medium range solution at the same time. Therefore, you can use it for short to the long-range sighting.
  • Offers you different mounting options with the two Picatinny offset rails included. Furthermore, you get two flip caps to keep the lenses protected and include a T-15 Torx Wrench with 2mm Hex Wrench for ease of mounting. Alternatively, it allows you to mount it together with additional optic devices.

Spitfire 3x Limitations

  • You do not get a Quick Detach Sling mount to use with the Spitfire. With the connector, it enables you to move a sling from one weapon to another and handy when out in the field hunting.
  • The reticles can be thin and not suitable for people with older eyes making it difficult to see and does not come with a custom reticle system to use with NON 5.56/223 calibers.
  • The weight is substantial when you compare it to other prism scopes available on the market,and it takes up 5.5-inches of rail mounting space at the same time.

Vortex Spitfire 3X vs. Burris 332

Right now, you may be thinking is the Burris 332 or Spitfire prism scopes a better option to choose. A fact is that both optics are similar and have excellent reviews. Furthermore, both are fantastic options if you are a shooter who wants to transition to fixed-power prism scopes. Both work on the AR-style rifle but the designs slightly different.

Both the AR riflescopes have multi-coated lenses to increase light transmission with anti-reflective coatings and air-to-glass surfaces. With the prism design available in both scopes, you get a 32mm objective lens with fixed 3X magnification. However, there are slight differences you can observe here:

BURRIS 332VORTEX SPITFIRE
Made with Ballistic CQ ReticleEnhanced Battle Reticle
Trajectory compensation to use with 5.56/7.62 cartridges out to 600 yardsRapid shooting with 5.56/45 cartridges out to 500 yards
Available in black, red, and green dot sightAvailable with a red and green dot sight
The eye relief is 2.5-inchesEye relief of 2.8-inches
FOV 32 feet @ 100 yardsFOV 31.5 feet @ 100 yards
Length 5.30-inchesLength 5.5-inches
Weight 16.6 with battery and mountWeight 15.4 ounces with battery and mount

As you can see, there are slight differences between the two,but both have the same features providing you with high-quality coatings on the glass for clear picture and fast target acquisition.

Both are easy to control from the elevation, windage to illumination. You can mount both to a standard flat top rifle and provide a durable weatherproof construction to use in any environment.

Is this scope for me?

While the Vortex optic Spitfire 3 X has an exceptional design, it may or may not be suitable for you. Here are some reasons why and why not it will work for you:

Recommended For

  • For people on a low budget as it is inexpensive and reliable
  • Great for capture, tracking still, and moving targets
  • Suitable to use during the day or night
  • You can use it without batteries
  • Small overall dimension and attaches to AR-pattern or Pistol Caliber AR weapons
  • The best prism optic for different shooters from short to long range

Not Recommend For

  • Flimsy eyepiece lid and can get lost in transit
  • Not suitable for older eyes
  • Regular adjustments needed with the eye relief
  • Not feasible to co-witness with irons

Vortex has made serious waves with the Spitfire 3X optic. The prism scopes a great option to use for different shooting scenarios. For the average shooter, the device is a godsend as it provides double and triple-duty and made like a tank.

When you decide to buy an AR-pattern unit, the prism optics ready to mount and shoot. You can put it on zero, put it away, and take it out after a while to shoot that coyote 300-yards away.

You can even hit the badger outside at the chicken coop 10-yards away. Alternatively, you can always consider the Burris AR-332 prism scope that is similar to the Vortex Spitfire.

How to Mount the Vortex Spitfire 3x

The manufacturer has set the mounting height at 40.4mm – a distance between the platform’s surface and the center of the prism. Suitable for the clamp to an AR15 picatinny rail, the height is low – 1/3 Co-Witness. But if you want a lower height (30mm) than what’s already low, remove the riser and the clamp of the platform.

You need shorter screws, which, luckily, come with the package. Use the screws to reinstall the clamp once you remove the riser. You need to lock threads temporarily in place using a compound to install the screws.

Here’s how to mount a Spitfire:

  • Ensure the brightness adjustment dial faces you as you align the scope.
  • Unfasten the two hex nuts at the platform and clamp the scope to the platform. Ensure recoil lugs remain in the grooves of the platform.
  • Verify whether there’s a full attachment between the platform and the mount by pushing down the scope as you move it forward. Fasten the hex nuts of the platform in a way to give them torque. Position the scope from the muzzle such that you’ve more than 2-inches of eye relief. You don’t want to place your eyes too close to the ocular lens, as you risk injury. Before you fasten the mount onto the rail, ensure the field of view is fully visible.

Adjustment of the Vortex Spitfire 3x

Talking of adjustments, there are lots to go around. Consider the following instances when you need to adjust your scope:

  • When installing the battery
  • Controlling brightness intensities
  • Focusing the sharpness (resolution) of the reticle.
  • Compensating for bullet drop and wind drifts

Let’s take a look at each briefly.

Installing Battery

  • Use a screwdriver or a coin to remove the compartment of the battery.
  • Insert and align the battery. Ensure the negative side (-) faces downward before you replace the cover.
  • As you replace the cover, verify whether you screwed it down completely in place with the O-ring seal.

Controlling Brightness Intensities

  • Turn the dial either way.
  • Once you choose either green or red numbers on the dial, turn the dial such that the color you selected faces you. It’s important to note that once you complete your task, rotate the dial back to 0 to avoid wasting battery.

Focusing Reticle Sharpness

  • Stare at the sky or blank through your Spitfire. Avoid staring at the sun directly through a scope to avoid damaging your eyesight.
  • Rotate the dial of the ocular lens either way to find the crispiest reticle image.
  • Ensure your reticle is in focus before your eyes and brain begin to make compensation. We recommend you make adjustments fast.

Compensating for Bullet Drop and Wind Drifts

  • Open the flip caps.
  • Use a screwdriver or a coin to turn the dial.
  • Follow the arrow labels on the dial for the correct direction.

If you’re zeroing at 50-yards, and a shot you fired has a bullet lodged 1-inch to the left of the bullseye, you’ll hear 4 clicks to move the point of impact to the right toward the target by turning the dial anticlockwise.

How to Zero or Sight in Vortex Spitfire 3x

Once you clamp the scope to the base of the rail, it’s time to zero.

First off, you must see through the bore of your rifle’s barrel to determine the maximum shooting distance and cartridge. Afterward, you can zero your scope at the range you determine during bore sighting.

We recommend you boresight at a close-range distance of between 25- and 50-yards. Vortex has an instruction manual for how to use a bore sighter. Alternatively, you can remove the bolt from your rifle and sight visually through the bore.

See Through the Bore of the Barrel First

  • On a rest, place your rifle squarely and extract the bolt.
  • See through the bore of the barrel as you position the bullseye inside.
  • Once you center the bullseye, make compensations for bullet drop and wind drifts to align the crosshair with the bullseye.

Zero or Sight in at a Range you chose

  • Once you finish seeing through the barrel, shoot the target once or twice at the distance you chose. The groupings you get at this stage enable you to approximate your target. Make adjustments for wind drifts and bullet drop again to move the point of impact at or near the bullseye.
  • Now, shoot three times, and take note of the center of the groupings this time.
  • With reference point being the center of the groupings, repeat the process of compensating for wind drifts and bullet drop. Use arrows to make reference to the direction in which you wish to turn the dial.
  • Again, fire three shots just to be sure. If not precise, repeat the procedure for more precision.

Buy on Amazon!

Conclusion

If you’re willing to fork out more money for a hybrid that leverages the strengths of a red dot and a scope, the Spitfire is your go-to choice. In our review, you’ve learned about the features, specifications, benefits, and drawbacks of the sight.

While Spitfire gives you a wider field of view at 100-yards than either a red dot or a scope, a 3x magnification limits your ability to be aware of objects around you. More than that, Spitfire is longer and heavier than any red dot. Hence, it’s less compact. What you can leverage is its excellent ability to leverage recoil and generous eye relief for distances inside of 100-yards. Just like its counterparts, Vortex has anodized the chassis and added multiple coatings to maximize light transfer.

Vortex Venom vs Viper

In this article, we are putting face to face the vortex venom vs viper, so you can pick the best of them. Both the products are amazing each with their distinct features sharing similar functions yet has noticeable differences seen. So which one is best for you? We are here to help with a comparison of the two side-by-side to make your choice a bit easier.

Comparison between Vortex Venom and Viper

Both Vortex sights are similar in performance, quality, and waterproof & shockproof to sustain the impact of recoil. The later is slightly smaller than the Venom making it the best choice for you to use with a pistol. However, if you need a more versatile sight, the Venom works with both pistols and rifles.

Even changing the battery is less complicated in comparison with the Viper. Due to the restrictiveness of the battery compartment, it does have a more compact design than the Venom.

Upon purchase, both the mini dot optics have the same accessories included. You get a Picatinny mount, Torx wrench, lens cloth, protective cover, and battery.

The Vortex VIP Unlimited Lifetime Warranty covers both of the sights and protected against defects and failures.

Optic Description and Features

Both sights have a compact design, but the Viper profile is lower and works best with handguns, offering a 6 MOA dot. The Venom offers you 3 MOA red dot making it ideal to use with long guns and handguns.

Both of them have a durable aluminum construction with fully multi-layered coated lenses. The multi-coated lens helps increase light transmission while reducing glares providing extreme clarity. The Venom objective lens size measures 26.5mm compared to the other one, that is 24mm. Both offer a 1x magnification power.

What makes the Viper stand out from the latter is it allows you to co-witness it with suppressor pistol sights. Where the Venom excels is the user-friendly design as the battery compartments at the top compared to the Viper. With the structure, you can leave the optic mounted during a battery change.

Both sights have a matte finish with waterproof and shockproof construction to protect it from the elements. The brightness controls located on the side of both and easily accessible. The MOA settings are set into the body and guard it against unintentional changes.

What’s more, is that both provide you ten levels of brightness settings with the Viper controlled manually and the Venom offers you auto and manual modes. The Viper uses a CR 2032 battery but has the same battery life of 150-hours as the Venom using a CR1632 battery.

Furthermore, both offer you a 14-hour auto-shutoff with a battery use of 30,000 hours on the lowest setting. The only difference here is you need to remove the Viper to replace the battery.

Cost Comparison

You can purchase both the Venom and Viper for under $250, making them affordable options to buy. Many sights from other brands cost more.

Further, both the optics is equal in design and performance making them reliable to use.

Both have the same build quality, controls, and features with the same battery use—but they do use different batteries. The main dissimilarity between the two is the two different sizes of dots available in the Venom, and it has a larger size than the Viper.

What makes the Venom unique is you can use it with more than one application (handguns and rifles.) With the smaller dot, you get precision when shooting. You can also use it as a backup with a magnified scope using the larger dot.

Therefore, if you need a sight with multiple uses, the Venom remains the best option. Compared to the Venom the Viper’s primary purpose is on handguns as the small size works well on pistol slides. With the larger dot, you get accuracy and quick targeting.

Alternatively, you can use the Viper with a rifle but not intended for this purpose. However, if you need speed for a pistol, you will not be disappointed with the Viper. Better use other specialized rifle scopes.

Which is the Best Mini-Red Dot Optic

Both the Venom and Viper is compact and great options to use. While the battery use is short on the bright setting, the automatic shutoff and extended battery use on the lowest setting makes up for it. Both sights are similar in construction, features, and quality.

The image quality of the Viper is not as bright compared to the Venom offering you clear image quality. Nonetheless, both have the same maximum click for windage correction of 100-MOA and 130-MOA for elevation correction.

Therefore, the choice depends on the use of the optic. If you need a mini-red dot sight fulfilling multiple applications, the Venom remains superior. However, if you only need one to use with a handgun, the Viper is sure to become your companion in any situation.

Either way, you are getting a sight that will last a lifetime.

How to Mount Vortex Venom?

Venom comes with a low mount (18mm), which is compatible with a rail with slots (holes). Therefore, you can’t fit the sight on a grooved base or a rail with slide cutouts. If your firearm doesn’t have a slotted rail, you’d need to purchase it from dealers.

The low mount is suitable for handguns and shotguns but the package comes with a riser, which you can use to increase the height to the level of AR15 rifles and pistols.

Follow the following steps when clamping the sight onto a slotted rail:

  • Use the available screws to clamp the low mount to the frame of the sight.
  • On the slotted rail of your firearm, clamp the sight, placing the recoil lug firmly into the slots.
  • Check whether you inserted the clamp fully into the slots and whether it’s attached to the exterior of the rail.
  • Push down the sight and slide it forward along the rail toward the bore of your firearm.
  • Fasten the clamp screw firmly on the rail using a flattop screwdriver or a coin.

How to Zero Vortex Venom

Zeroing enables you to determine you needs: cartridge and maximum range, before you embark on shooting or hunting.

When you know exactly what you want, you won’t waste money on a firearm, which gives you extra ranges. Zeroing also enables you to make the most out of your cartridge.

We recommend you choose a short-range distance at first. A zero distance of between 25- and 50-yards is suitable.

Bore Sight First

But before you embark on zeroing, you need to look through the bore of the barrel of your firearm. When bore sighting, follow the steps below:

  • Extract the bolt from your rifle for a clear view.
  • Look through the barrel.
  • Center the bullseye inside the barrel.

Zero Your Sight at the Range

Once you finish bore sighting, it’s time to zero your sight at the range.

  • Place a shot once or twice at the target.
  • Examine the groupings to determine how far off the bullseye the bullets have landed.
  • Fire three shots this time.
  • Examine the groupings, and measure how far off the bullseye the center of the groupings is located. Make corrections for windage and elevation as necessary based on the center of the groupings (See below).
  • Again, fire three shots and examine how far the center of the grouping is located from the bullseye. Repeat the procedure when unsatisfied.

How to Make Corrections for Windage and Elevation

One MOA is equivalent to 1.05-inches at 100-yards. If you chose 25-yards as a sight in distance, then you require to hear 1-click to move the point-of-impact of the bullet by ¼-inches. Or, ½-inches at 50-yards, 0.3-inches at 30-yards, etc.

And so, if the bullet landed at a 25-yard target 4-inches to the left of the bullseye, that’s a result of wind drifts.

On one side of the frame, there is a dial for windage adjustment. Rotate the dial down (clockwise) to until you hear 16 clicks to move the point-of-impact 4-inches to the right.

How to Aim Vortex Venom

If you mounted and zeroed your sight correctly, aiming or holding down your sight shouldn’t be a problem.

As long as you’re able to see the red dot reticle, you can acquire targets easily and fast.

Be careful, though.

Red dots offer you an unlimited eye relief, but this doesn’t mean you place your eye too close to the ocular lens lest recoil shocks and impacts hit your face, leading to injuries. Look for a comfortable distance of your eyes from the eyepieces.

We recommend you place your eye at least 4-inches away from the ocular lens when aiming.

Conclusion

After comparing the Vortex Venom vs Viper, we have to say that both are the lightest and most compact sights available on the market, with outstanding build quality. Built to withstand heavy recoil, Vortex anodized the aluminum chassis. More than that, anodizing on both sights has a matte black finish, which removes flares and reflections, which irritate and obstruct your vision. The anti-glare finish on the chassis construction also provides you with stealth abilities.

ArmorTek layer on the both chassis contributes to toughness and resistance against shocks and impacts of hitting, dropping or recoil. O-ring seals prevent water, oil and dirt from damaging the optics and internal components. Contributing to optical quality are multiple coatings, which cover the lenses completely to maximize on the available light. While Viper is slightly heavier than Venom when you add a mount, it’s more compact, as its length is shorter. Viper uses a most common battery – CR2032. Venom uses a rare form of battery – CR1632.

However, when it comes to changing batteries, it’s easier with Venom than Viper, as battery compartment is on top. No need to dismount the sight. Both sights have an auto shutoff feature after 14 hours. But Venom has both auto and manual modes for brightness settings. Viper has lock screws which you need to loosen before you start making corrections for wind drifts and bullet drops. Venom has none. And so, depending on your needs and preferences, choose either sight, as they cost more or less the same.

The 10 Best Scopes for 6.5 Creedmoor

Top Long Range Scopes for 6.5 Creedmoor

It is very challenging to find out a correct scope for a rifle. A lot of features and specifications in a scope. that peoples are not familiar with. Let’s see our top picked ten long range scopes for 6.5 Creedmoor rifle.

1. Vortex Viper HST 6-24×50

Moving on up to the Vortex Viper HST we find what is possibly the best Vortex scope for the 6.5 Creedmoor.

HST stands for Vortex’s Hunting, Shooting and Tactical line of scopes, and you’ll notice the specs are pretty similar to the regular Viper we just looked at.  So what is different?

Starting out, we need to remember when choosing the best 6.5 Creedmoor scope, we need to choose a highly precise scope.

Building on the regular Viper, Vortex added important precision tools like target style turrets. In fact, these are some of the best features of the Viper HST.

Target turrets differ from regular windage and elevation turrets in that they are quickly click adjustable to fine increments without tools.

This makes them unsuitable for the woods as they can be easily knocked out of alignment, but fantastic for bench rest shooting.

Another great target shooter friendly aspect of this scope is the VMR MOA reticle which is advertised as allowing for holding on a target at long distance ranges.

Is this the best long-range scope for the 6.5 Creedmoor?

Well, it’s undoubtedly one of the leading contenders for sure. While this scope is advertised as being “tactical”, it is more likely the only thing tactical about it is a desire to market it to more people.

The same objections to target turrets in the woods apply to a police sniper rifle. Maybe it won’t get jostled around, but why take that chance? Stick to the target bench, and you’ll love the Viper HST.

2. Vortex Viper 6.5-20×50 PA

The Vortex Viper is one of the best long-range scopes for 6.5 Creedmoor for several reasons.

While no scope is perfect, the basic second focal plane construction allows for a higher grade scope at a lower price compared to other competitors.

By building a fairly standard scope, Vortex was able to beef up construction and optical clarity while keeping within a reasonable price point.

While the Viper is somewhat pricey for what you get, it is plenty acceptable for a 6.5-20×50 second focal plane scope.

6.5 Creedmoor demands an enormous scope to shoot small groups at long ranges. We really liked the big 50mm objective lens, which is essential for a clear image at the thousand-yard distances 6.5 Creedmoor is capable of, and the 30mm tube is the only logical pairing with an oversized objective lens.

The magnification range is also excellent, making this an ideal hunting or match target shooting scope. The mil-dot calibration is pretty standard and a popular way to calculate the distance to your target.

Of course, what makes the Vortex Viper an excellent scope for 6.5 Creedmoor also makes it a bit overbearing in some cases.

You will need unique high-profile rings to get the most performance out of your scope, and this is large enough that you might not want to lug it around in the woods all day on a hunting rifle.

On the other hand, it is an ideal scope for a bench rest rifle or hunting in light or medium terrain, making it a pretty good choice for the best 6.5 Creedmoor scope.

3. ​Steiner T5xi 5-25×56

Steiner offers a fascinating long-range scope. Is it the best scope for 6.5 Creedmoor? Well, the answer is “for most users, yes.”

And by most users, we mean this scope might even live up to the marketing claim of “tactical,” which often gets thrown around with little thought. The 56mm objective lens and overall size of this scope make it a bit ungainly for hunting, and the unusually sized 34mm tube will make it a bit harder to find good rings.

However, the rest of the Steiner TX5i is very solid and very much at home on the bench or a long-distance range.

This brings us to the tactical claim. These days “tactical” darn near means anything that you can even remotely associate with military or sniper use, even if it’s just slapping a desert tan or olive drab paint job on something.

However, tactical should also be practical, but it should also stand out from other similar products. Here, Steiner manages to make an overgrown, long-range scope built for rugged duty, but not so crazy in its magnification as to be absurd, or limit its utility.

Nor do we have the vast target turrets of other scopes here, which really suggests that the claims be a tactical scope make sense.

It isn’t too much of a stretch to see this scope on a police sniper rifle in 6.5 Creedmoor, which means it isn’t too much of a stretch to see it on your favorite rifle either.

4. Leupold VX 3i 6.5-20x50mm

One of the best Leupold scopes for 6.5 Creedmoor is the Leupold VX-3i. Now, this particular version is an excellent long-range scope, suitable for hunting or precision target shooting.

Leupold has developed a unique optical coating called Diamondcoat 2, which both protects the scope lenses and offers superior light transmission, which in turn provides a more transparent, crisper target picture.

We really enjoy the side focus knob, and large 50mm objective lens, which is essential for low-light hunting.

Because 6.5 Creedmoor is a long-range cartridge, even hunting scopes for it should look less like a traditional hunting scope and more like something you’d typically find on a bench.

However, Leupold knows that bench rest scopes aren’t always ideal for hunting. That’s why they ruggedized the VX-3i and made even the fine controls easily manipulated when wearing gloves. That is a level of attention to detail that stands out.

However, price is an issue with this scope. Costing several times the price of an average rifle scope, this price tag isn’t for the casual hunter or shooter. However, with some 6.5 Creedmoor rifles selling for as much again or more, it isn’t unreasonable to drop the cash on high-end glass- if you can use it.

If you are hunting at the extreme ranges of the 6.5 Creedmoor or hunting in difficult situations where you need the best possible scope, by all means, buy the VX-3i. Otherwise, there are more scopes at more modest prices that will work better for you.

5. Nikon Black FX1000

The Nikon FX1000 is another contender for the best long-range scope for 6.5 Creedmoor.

Not only is it more modestly priced than some other high-end scopes, it arguably has more features than some more expensive scopes making it a sound choice for the budget-minded shooter.

We really liked the first focal plane construction and glass-etched reticle, which reduces the number of moving parts in the scope.

The adjustment turrets are built for rapid, on-the-fly correction and a quick return to the original zero, and the side-focusing parallax adjustment really made this scope stand out.

However, like many scopes designed primarily for target shooting, the FX1000 isn’t the best optic for hunting with the 6.5 Creedmoor.

Those exposed, easily adjusted target turrets are a liability in the brush. However, if you want a good long-range scope for your 6.5 Creedmoor rifle, then the FX1000 is worth a seriously close look.

Like other long-range target scopes we’ve looked at, the FX1000 has a 50mm objective lens which is all but standard these days for a good target scope, along with the requisite 30mm main body tube.

We aren’t quite sure what magic Nikon uses to keep the price down on this scope compared to the competition, but we won’t complain about that, and neither should you!

The budget-minded 6.5 Creedmoor shooter will appreciate saving a couple of hundred bucks over similar optics and can quite happily roll that savings into more ammo or a bit nicer rifle while being assured there is nothing substandard with their scope.

6. ​​Athlon Argos BTR 6-24×50

The Athlon Optics BTR certainly qualifies as the best hunting scope for 6.5 Creedmoor. The Athalon BTR is a triumph of modern manufacturing methods, inasmuch as it is absolutely loaded with high-dollar features but priced within easy reach of most shooters.

We were floored by how impressive this scope is. A first focal plane, glass-etched, illuminated reticle scope, target turrets that aren’t so oversized as to be a problem in the woods, side parallax adjustment, and even a quick focus throw lever built in, all show exceptional attention must-have details in a scope, but somehow at a price around half that of the competition.

While we were marveling over these features and the overall quality of the design, we did note a few things.

Reviews show that now and then, Athlon ships a dud scope but that customer service was very quick and responsive.

On the other hand, several reviewers with first-hand experience were favorably comparing the BTR to far more expensive Vortex optics.

Certainly, we are inclined to agree that this is a real high-end scope at blue-collar prices. But we also think it is just the ticket for an actual long-range scope that is suitable for the woods.

The external controls aren’t as easily knocked about in brush or hard use as other target scopes, and the illuminated reticle is an absolute must-have for hunting in low-light conditions.

All in all, Athlon managed to hit a lot of sweet spots with this optic.

7. Bushnell Elite Tactical 1-6.5 x24 BTR-2 FFP

Not what you’d expect when looking at the best 6.5 Creedmoor scopes, is it? This premium compact scope from Bushnell is right at home on top of the 6.5 AR-10-style rifles that are popping up more and more often.

Perfect out to about 400 yards, you won’t be winning any long-distance matches with it, but the lightweight, compact design is perfect for a lightweight semi-auto hunting rifle or even a tactical rifle for law enforcement or general knockabout ranch rifle duty.

Just because the 6.5 Creedmoor has thousand-yard potential doesn’t mean most folks are shooting at that range. In fact, for many 6.5 Creedmoor shooters, a basic 300-400 yard scope that isn’t overly heavy is just the ticket.

We liked the illuminated reticle for low-light hunting or personal defense use, but there are a few drawbacks to the Bushnell Elite Tactical BTR-2. For one, the bullet drop compensator is all wrong for 6.5 Creedmoor.

However, you can easily calculate where your rounds are hitting with the marks, and write corrections on top of your scope. The somewhat small 24mm objective lens is not so easy to deal with.

You’ll have a smaller sight picture, but again, that is just fine for the ranges this modest little scope is built for. But not as small as a red dot sight.

If you have a 6.5 semi-auto rifle, are building a lightweight bolt action, or want a compact scope for real-world hunting and casual shooting distances, you should give the Bushnell Elite a closer look. Or build that wild 6.5 Creedmoor tactical rifle you’ve been wanting.

8. Burris XTR II 8-40×50

The Burris XTRis a great scope for 6.5 Creedmoor or any other round! This is a high-dollar scope, but the incredible range of features and high-quality construction certainly justifies its price tag and then some.

By now, you’ll be used to seeing 50mm scopes with a decent range of high to low power magnification, which successful 6.5 Creedmoor shooters need for the long ranges this cartridge is capable of.

Burris has long been famed for the quality and clarity of its optics, and it shows here.

Time and time again, users rave about the crystal clear glass and brilliant sight picture of the XTR, which are crucial for successful long-range shooting.

The to-be-expected first focal plane construction, zero-reset turrets, and side parallax adjustment put the XTR front and center of the high-end target scope market while still being more affordable than other high-end 6.5 Creedmoor target scopes.

The XTR is a benchrest scope, and most buyers will use it for that purpose which is more in line with the design and performance the scope is capable of, but 6.5 Creedmoor shooters will love it regardless of the end use. Put it on a nice custom rifle, and you’ll be in match-shooting heaven.

9. ​Nightforce 5-20×56 SHV

So Nightforce makes nice scopes. They also make expensive scopes, but that is ok because Nightforce makes really nice scopes

And this may also be the first truly dedicated 6.5 Creedmoor hunting scope we’ve looked at, because Nightforce also builds hunting scopes that excel at many other things. You won’t find fancy target turrets, side parallax adjustment, or fast focus throw levers here.

In fact, this is a scope that isn’t meant for making tiny little tweaks that only a bench rest shooter who has all the time in the world to take a shot might want, instead, it is a scope built for taking a mountain goat up a steep hill, or taking that trophy elk a few hundred yards away during the ragged edge of twilight where natural light is more a theory than reality.

That is to say, Nightforce optics are optimized for low-light purposes. Naturally, they include an illuminated reticle, but we were impressed at how much effort goes into making these scopes into light-gathering, long-range monsters that live up to their brand name.

Of course, this extreme specialization comes at a cost. What is optimized for one thing may not work as well for another.

This is a long-range, hunting scope. This means you could use it for tactical work, but it’s probably overkilled, and it may not have the hyper precision you want on a bench rest gun.

But for everyone else who needs a rock solid, high-powered 6.5 Creedmoor scope? Well, Nightforce delivers the goods.

10. ​Swarovski Z5 Ballistic Turret: 3.5-18×44

The Swarovski Z5 is a great 6.5 ballistic scope. One thing that promptly stood out to us is that the Z5 is waterproof up to 4 meters.

While other scopes advertise being fog proof or lightly waterproof, few will claim total submersion to this depth.

While you might think this is a pointless feature, remember, hunting accidents do happen, and wouldn’t it be nice if your scope kept working after falling into a river or stream, and not just your rifle?

This waterproofing is essential for hunters who go out into rugged conditions. Swarovski has what they call “HD” lenses, offering incredible optical clarity hitherto unknown in scope at any price, and they live up to their claims. We think they might be some of the most precise lenses on the market today.

A locking ballistic flex turret is also nice and gives the Z5 the flexibility of a bench rest scope with the utility of a hunting scope.

Of course, all this comes at a price. The Z5 sells for about what you’d pay for a quality 6.5 rifle, which is up there in cost with other premium scopes, but then again, the adage of you get what you pay for rings true here.

A top-quality 6.5 Creedmoor scope is a lifetime investment you can pass on to your children, so if you are already invested in a high-grade rifle, your optics should probably be equally high-grade.

FAQs about 6.5 Creedmoor scopes

Why do you need to specialize in the 6.5 Creedmoor?

The cartridge is about ten years old and came in to solve long-distance shooting imperfections. The goal behind its creation was to come up with highly precise ammo that offers the best accuracy and contains a high ballistic effect.

Shooters who swear by them also say that the recoil is somewhat low when using this kind of ammunition.
Long-distance shooting needs bullets that have a good barrel with the right chamber pressure. The 6.5 achieves the features, not to mention the ability to be used in short magazines.

Due to how far the 6.5 can travel to reach the target, if you are standing at about 1000 yards away from the hit point, you need a scope that can facilitate on-point hits from your shooting position.

Why do you need a unique scope for the 6.5?

This kind of ammunition is used in the long-distance shooting. Many rifle scopes in the market can aid in distant vision, but you need something special for the 6.5 ammo. It will be easier to use a specified scope since it’s already defined for rifles aiming further.

That way, you can solve problems related to inaccuracy, shaking, zeroing your rifle, and much more since the scope is made to cover all that. Another reason is that it is fitted with all the features you need for the expedition.

Long-distance aiming will need a scope that has the best optics, proofing specifications, and a broad magnification range. It also needs to have the ambient light-gathering ability. Scopes for the 6.5 Creedmoor cannot ignore such factors hence the reason to get one for your rifle.

Who else can use such scopes?

Apart from those using the 6.5 Creedmoor, other users could utilize the power of the specialized scopes on their rifles. You can consider the following apart from using the ammo:

– Do you need an instrument that can survive harsh weather?
– Are you looking for an accurate scope?
– Do you need a scope with a guarantee of long-term use?

If your answer is yes in all the questions, you can join the 6.5 queues and get a proper scope to help you aim better while out there.

If you are looking to hunt at night, better get a specialized thermal scope.

What is the effective range of a 6.5 Creedmoor?

The 6.5 Creedmoor stands out for long-range shooting for all the right reasons. With the 1.92-inch case length and 2.82-inch cartridge length, you can also use it in short actions. Therefore, it is a great option to re-barrel your .308.

Furthermore, the cartridge is popular with precision rifle users as the effective range of the 6.5 Creedmoor is past 1,000 yards. It can go as far as 1,300 yards when used in the right conditions. While there are different grains available, the 140-grain A-Max is made for long-range shooting.

What Magnification is required?

To answer the question depends on where you plan to use the riflescope. If you are hunting in thick brush, your shots are relatively short, while shooting in open fields, you need longer range shots. Therefore you need to select an optic that fits your needs.

For Short Range Shooting: If you hunt in an area where your average shot is 100 yards or less, you can benefit from using a riflescope with fixed power from 2x to 2.5x magnification. However, if you do decide on a variable optic make sure you can set it to 2.5x to keep it there. You can use 1 – 4x variables for short to medium-range shots.

For Medium Range Shooting: If you need to make an average shot between 100 to 200 yards, you can benefit from using a 4x fixed power scope. However, if you prefer a variable power model, look for one with 2-7x, 2.8-8x and 3-9x. We recommend you look at the 2-7x32mm or 2.5-8x36mm models. With one of these, you can get the right magnification for shots made out to 300 yards and get a wide field of view at the lowest magnification setting.

For Long Range Shooting: However, if you want to take full advantage to shoot from 300 to 350-yards, using a fixed 6x riflescope will work well. Alternatively, if you prefer variable magnification, consider a model with 2.5-8x, 3-9x, and 2-10x optics the best choice. On the other hand, if you plan to do varmint shooting, select a 4-12x model instead.

What Features to Consider to Buy a Scope for a 6.5 Creedmoor Rifle?

When choosing the best 6.5 Creedmoor scope, there are a few key considerations:

What are you using it for? A scope for dedicated benchrest or long-range shooting will have features that do not get used on a hunting scope. Consider the primary market the scope is intended for, and ask if that matches up with your planned use. Remember, a great hunting scope is an ok match target scope, and some match target scopes are better left on the bench, and not taken into the woods.

Price: Sadly, very little about 6.5 Creedmoor is cheap. You pay a price for precision, which is reflected in the ammo, rifle and optics cost. On the other hand, modern manufacturing methods have driven the cost of high grade optics down, so you can get more scope for your money now than at any point in history.

Brand quality: Every scope we reviewed is sold by well-known, reputable manufacturers with a proven history of quality construction and customer service. Buying the best 6.5 Creedmoor scope is different than scoping a .22 plinker used to knock around tin cans. Don’t buy optics from an unknown company that might not be around when you need them the most.

Conclusion

The 6.5 Creedmoor is here to stay as a popular, long-range precision target round, powerful hunting cartridge, and proper tactical round that offers better accuracy than other cartridges. A straight-shooting, hard-hitting round requires optics to match.

There are a bewildering array of scopes on the market, and not all are suitable for 6.5 Creedmoor. We hope that even if you don’t buy one of the scopes we reviewed here, you have gained a better understanding of what goes into a good 6.5 Creedmoor scope and how to choose one.

Review of the Best 10 Under Bed Gun Safes

Whether you own one gun or a few firearms, you understand the need to hide guns away from burglars and children. The easiest way to do that is to use an under bed gun safe. The question with most homeowners is whether the safe is accessible enough in case an intruder breaks into the home. Although the gun safe under bed is not as accessible as hanging your firearm by your bedside, you can still access the gun fast, thanks to the use of a digital lock that is easy to open. Modern safes come with a biometric fingerprint entry system so you can access the gun with much ease.

Top Under Bed Safes for Your Guns

1. Monster Vault Dual Lock

RATING – *****
PRICE – $$$$

The Monster Vault Dual Lock is so named thanks to its heavy build and the availability of two locking systems. It’s a defense vault that features 140 pounds of cold-rolled heavy-duty steel to keep your guns safe from intruders and elements. It is a heavyweight gun safe, which means the intruder has no chance with it. Inside, the safe has a fabric lining that wicks away any sweat and condensation to keep your guns dry at all times.

With its size, this safe can hold long guns, shotguns, pistols, ammo, and still leave room for any other item such as jewelry that you might want to keep safe.

The safe uses a programmable combination lock with a pin between three and eight digits for added safety. It also has a key that you can use for emergencies or when you cannot remember your combination pin. Thanks to its weight, it comes in handy for people living on the ground floor. Again, it is a spacious safe that will accommodate multiple guns, so buy it when you have more than a few guns.

Check Price on Amazon

FEATURES
• Material: Cold-rolled steel
• Size: 48 X 28 X 7 inches
• Lock: Programmable combination lock and backup key

PROS
• Sturdy construction
• Spacious to hold many firearms
• Has a fabric lining to keep firearms dry
• Has a backup mechanical key

CONS
• It is very heavy
• Relatively pricey
• Not waterproof and fireproof

2. Hornady Rapid Safe

RATING – ****
PRICE – $$$

The Hornady Rapid Safe is an ideal unit for owners of guns, AR-15s and shotguns. It sports a 160-gauge hardened steel body, which makes it heavy and something burglars might not want to mess with. Hornady uses advanced RFID sensors that give you confort accessing your gun safe when you need it the most. Simply scan the RFID wristband provided, the key fob, or decal to open the gun safe.

Each safe is certified child-resistant as the manufacturer follows international gun safe safety standards for child, pry resistance and much more. The safe comes with pre-drilled holes for vertical or horizontal mount. It is AC and battery-powered, which makes it available every time you need it.

Check Price on Amazon

FEATURES
• Material – 16-gauge steel
• Size – 40.5 x 13.5 x 8.7 inches
• Lock: Advanced Radio Frequency Identification (RFID) sensors and backup keypad

PROS
• Heavy-duty 16-gauge steel body
• Adjustable interior racks
• Portable at only 50 pounds
• Advanced security system

CONS
• The power cord is short
• Keypad stays on when connected to AC power
• Loud operation

3. Secure It Fast Box Model 47

RATING – ****
PRICE – $$$

The Fat Box is a safe all-steel gun safe for under bed designed to hold your long guns, short guns, and handguns. It features an digital lock with a keypad and a backup key override. With its 47 x 13 inches size, it provides enough room for more than one gun.

Even through the unit sports an all-welded steel construction, it is still lightweight at only 47 pounds. At the back, the unit has a louvered back panel that makes it ideal for vertical application. Inside, it has a neoprene pad cushion to protect your gun further. With a vertical kit, you will have storage for two rifles.

Check Price on Amazon

FEATURES
• Material – All-welded steel
• Size – 47 x 13 x 6.5 inches
• Lock – Digital with key override

PROS
• Entry with a key override
• Holds multiple firearms including two shotguns, AR-15 with sights, and a handgun
• Lightweight construction

CONS
• The electronics might fail but the key won’t
• Its lightweight construction may not intimidate any burglar
• It has many bolt holes that you may never need

4. SnapSafe Under Bed

RATING – ****
PRICE – $$$

The SnapSafe Under Bed safe features a 14-gauge long-lasting steel construction to keep your firearms safe. It comes with bolt holes if you want to install it permanently. On opening, the safe slides out giving you quick access to your gun and anything else you might have stored in them. At 48 by 24 inches, the safe is large enough to hold at least two rifles, handguns, and ammo. You can also use it to hold jewellery and documents among others.

The safe uses a digital entry system but with a backup key for fast accessing the safe. You can program the lock to take between three and eight digits access codes. Its door is pry-resistant so children and burglars do not have access to the gun. Each unit comes with a 3-foot security cable that allows you to power your safe from three feet away.

Check Price on Amazon

FEATURES
• Material – 14-gauge steel
• Size – 48 x 24 x 7 inches
• Lock – with a backup key

PROS
• Spacious interior to hold multiple firearms
• Padded for horizontal application
• Comes with pre-drilled holes for easy installation
• Its drawer slides out smoothly all the time

CONS
• The beeping from the keypad is loud
• It is heavy
• The keypad is not easy to access at night

5. V-Line 2912-S

RATING – *****
PRICE – $$

If you need an under the bed gun safe to hold one gun or two handguns, this will come in handy. It is a 12 by 9 inches handgun safe that’s made of heavy-duty steel to make it safe. Since this is a small sized safe that burglars and children can carry away, you need to bolt it permanently under the bed for easy access and to ensure no one else gets to it. To do that, the unit comes with pre-drilled bolt holes.

Each safe uses a keyless lock that doesn’t require batteries. On the top surface are five buttons and a knob. Set the button combinations between one and five buttons to secure the safe. Like other units on this review, this safe also comes with a pry-resistant door to ensure children and burglars don’t get to the gun.

Check Price on Amazon

FEATURES
• Material – Steel
• Size – 12 x 9 x 2.5 inches
• Lock – High-grade keyless

PROS
• Roomy enough to hold two handguns and ammo
• Doesn’t require batteries to operate
• The keyless system is safe with no chance of jamming
• Durable steel construction

CONS
• The lid can be challenging to open when you are in a hurry
• It can be challenging to set the security at first
• You have to push down the top to close it

6. Secure It Fast Box Model 40

RATING – ****
PRICE – $$

The Fast Box Model 40 is an ideal unit when you need to secure one rifle, a gun, and ammo. It can hold two rifles but they might not fit in an easy-to-get manner. It sports an all-welded steel construction that makes it 45 pounds when empty. When using it under your bed, the unit comes with pre-drilled holes so you can bolt it securely.

Secure It uses a lock with an override key in case the electronic lock fails or there is no power. It has a louvered back panel for vertical application. It also has a neoprene pad cushion for under bed use. It also has quick-release tie-down straps if you ever need to carry your safe out of the house. This one-rifle safe allows you to store the rifle with your scope and magazine still attached, and a gun.

Check Price on Amazon

FEATURES
• Material – All-welded steel
• Size – 40 x 13 x 6.5 inches
• Lock –Electronic lock with a key override

PROS
• Lightweight construction
• Has a pad cushion that protects your rifle
• Comes with pre-drilled installation holes
• Holds a long firearm with scope and magazine still attached

CONS
• Only accommodates one rifle comfortably
• Lightweight construction might feel cheap
• The keypad is loud

7. V-Line Semi-Flat

RATING – *****
PRICE – $$$

The V-Line Semi-Flat is another safe for your handguns. It accommodates two full-size handguns and still leaves room for magazines. You can use a lift-out half tray to organize the safe to allow it to hold small valuables and ammo. This being a small handgun safe, it is easy to attach beneath your bed for more confort. V-Line offers it ready with pre-drilled installation holes.

It uses a simplex push-button system that doesn’t require batteries or power connections. The buttons are on the side for quick response. The pull-out drawer has sliders to pull out your gun smoothly every time.

The box features a 12-gauge steel construction that makes it 21 pounds. Its exterior surface has a black powder coating. Inside, it has a 0.75-inch form to protect your firearms and your valuables.

Check Price on Amazon

FEATURES
• Material – Durable 12-gauge steel
• Size – 11.5 x 8.75 x 2.5 inches
• Lock – Keyless pushbutton

PROS
• Sliders for smooth operation
• Has anti-pry brackets for added safety
• Quick access
• Large capacity to accommodate two handguns

CONS
• It might take more time to set up the lock
• Drawer might wobble a little when you pull out the drawer
• There is no larger version for rifles

8. Buffalo Tools UBSAFE

RATING – ****
PRICE – $$$

The UBSAFE has enough space to accommodate two rifles, a shotgun, a few handguns, ammo, and any other essential items you might want to protect. It sports a premium 14-gauge steel construction with a black powder coating that prevents rusting and keeps your guns safe. The unit slides open when you enter the password code and the key to open. The code is programmable into a three to eight digits code.

The door has anti-pry brackets that make it safe and ensure that children and burglars cannot get to it.

Check Price on Amazon

FEATURES
• Material – 14-gauge steel
• Size – 48 x 28 x 7 inches
• Lock – Programmable electronic with backup override key

PROS
• High quality 14-gauge steel construction
• Sliders to accommodate up to 100 pounds
• Spacious enough to accommodate multiple firearms
• Has a cushion that protects your firearms

CONS
• Large and bulky to carry
• The locking system might fail
• The spacious interior can benefit from dividers

9. ECR4Kids Personal Safe

RATING – *****
PRICE – $

If you need a spacious under bed gun safe on a budget, the ERC4Kids safe might be a good choice for you. It is spacious enough to hold up to two shotguns, a few handguns, magazines, and other essentials that you might want to protect. It comes with wheels so you can easily roll it away under the bed. Besides, it also has a steel security cable with a carabiner to secure the safe on the bed frame so it doesn’t roll away so far. With its wheels, it means that you cannot secure the unit permanently on the bed of the floor.

It sports durable plastic and metal construction with a smooth finish. When empty, the unit weighs 50 pounds. It uses a keyed entry unlike most other safes with digital locks. Although this might not be fast-accessible, it doesn’t fail and the manufacturer made it a challenge to pick.

You can open the door halfway if all you need is your handgun and ammo. When you need your shotgun or other gear at the farthest end, you will need to open the door fully.

Check Price on Amazon

FEATURES
• Material – Plastic and metal
• Size – 26.5 in. x 16.3 in. x 5.8 in.
• Lock – Keyed

PROS
• Large capacity for shotguns and handguns
• Easy to use keyed entry
• Caster wheels for confort
• Comes with two keys

CONS
• Made of plastic, which means it is not waterproof or fireproof
• The keys are universal and may not be safe
• You cannot install it under the bed

10. Allen Company Rifle Storage Locker

RATING – ****
PRICE – $

This locker is different than all the others in this review. Instead of steel, it is made of high-quality polyester fabric like a carrying case. It is spacious enough to hold up to four long guns comfortably. While there, the guns are safe from elements, but they may not be safe from children and burglars. Because instead of a locking system, the locker has zippers, children can get to it.

Inside, the locker has molded foam inserts that divide it into different compartments for each of your four rifles. It has a minimal design and clean aesthetics. All the sides and the top cover have a lining that further protects your rifles from elements and scratches. On the shorter sides, the case has loops with which you can pull it from under the bed. Better yet, you do not have to struggle looking for a key as all you need to do is unzip the locker.

Check Price on Amazon

FEATURES
• Material – Polyester
• Size – 47 x 17 x 5 inches
• Lock – Zippers

PROS
• Affordable locker
• Spacious enough to accommodate four rifles with scope and magazine
• Has foam-molded inserts to organize the case and protect guns
• Easy to handle zips

CONS
• It is not safe for children
• It is relatively less durable
• The foam inserts minimize interior space


Under Bed Gun Safe Buyer’s Guide

With so many under bed safes in the market, which one should you go for? Consider the following features:

Placement

You can attach a safe on the floor under the bed, on the board under your bed like a drawer, or you can just place it on the floor. The safe you choose based on placement will depend on which version you find easy to use and the height of your bed.

Ensure that the safe you choose has pre-drilled holes and comes with bolts or screws for installation. If the unit does not need installation, and instead rolls away under your bed, ensure it has attachment loops for ease of use.

Locking system

A gun safe protects your firearm from burglars and children. Granted, you need to have a secure entry system. Most safes today come with an electronic keypad system with an override key. The digital keypad is programmable and you can set a password code of between three and eight digits. The only challenging part about these locks is that they use batteries or need to be connected to a power source. For some, the keypad makes a lot of noise and will alert a burglar that you are opening a safe. However, they are not easy to break into.

Some modern safes come with RFID and fingerprint sensors so you can get to them with ease. These are the easiest to use, but they might cost a little more. It is still possible to see a keyed lock that is simple and affordable, but it is easy to pick.

Others have keyless push-button systems. Whichever lock you pick, ensure that the unit has anti-pry brackets to limit burglars.

Materials

The material determines the durability and safety of the safe. If you need the utmost durability and strength, choose a steel construction. Ensure the steel has a coating that prevents rusting. If you only need to keep your firearms safe from children, plastic and fabric materials with a strong padlock will work just fine. However, these two will not deter any burglar.

Storage capacity

How many guns do you want to store? Do you have long guns, shotguns, or handguns? The safes come in different sizes to accommodate your guns. For long guns, ensure the safe is at least 48 inches long.

Ease of use

The most challenging part of using an under bed safe is setting the locking system. Most digital locks are easy to set and the keyed system needs no setting. The only challenging setup comes with the keyless pushbutton locks and the sensor locks (RFID and Fingerprint). However, you can always follow the manual to set them with ease.

Batteries

If your safe uses a digital lock, it needs batteries or AC power. Rechargeable batteries are better than replaceable batteries as they save you extra costs. Batteries come in handy in case of a power outage. If the unit uses an AC connection with no batteries, ensure that it has a backup override key.

Alarm

An alarm is not a necessity but it alerts you when a child or any unauthorized person tries to access the safe.

FAQs

Are gun safes easy to break into?

No, most locks are not easy to break into. However, if you need the utmost safety, avoid keyed locks and fabric material safes.

Should I buy a gun safe?

You should buy a gun safe if you need to protect your guns from elements, burglars, and children while making them easy to access.

Our Verdict of gun safes under bed

The Monster Vault Dual Lock might be one of the best under the bed gun safes if you are looking for a spacious safe to hold multiple weapons and if you need digital security. The safe comes with a cold-rolled steel construction, a digital lock, and a backup key.

If you want the ruggedness, security, and ease of access, but you are not willing to pay the premium price like you would with the Monster Vault, pick the Hornady Rapid Safe. It comes with RFID sensor locks, steel construction, and enough space to hold multiple rifles. It is affordably priced and weighs less than the Monster Vault above.

If you are on a budget and still need a functional unit, the ECR4Kids Personal Safe might be a great choice. It sports a plastic and metal construction with wheels so you can roll it under the bed. The unit is sturdy and tough regardless of its plastic construction.

Should I Buy A Gun Cleaning Kit?

A cleaning kit is always essential to keep you clean and sterile. This doesn’t only apply to living beings but also to the stuff we use. If you a big-time shooting or hunting enthusiast, you have to ensure that your gun works just fine, even after years of use. And this is only possible if you clean and maintain it regularly. you need to be sure of certain things that assure your gun goes on with the look and works like newly bought.

Hence, it is mandatory to keep your firearm clean. Multiple firing can leave your gun with powder residues and other filth and gases in the barrel. A proper cleaning kit that includes everything you need is a must if you don’t want to buy the cleaning essentials individually.

The cleaning and maintaining techniques for every gun are different. But, one thing that’s common is that you just need to have a cleaning kit. Most cleaning kits come with all the necessary items that you need to properly clean your gun.

What Does A Gun Cleaning Kit Include?

A gun cleaning kit includes all the vital ingredients required to clean the different parts of your gun and keep them free from dust build-ups.


It comes in different sizes and includes several items to encourage your cleaning sessions. So, the most basic and common items in a kit are:

  • Lubricating Oil: The oil lubricates the parts of guns for their smooth functioning. Lubricants are essential for guns to reduce resistance, especially in the moving portions.
  • Solvent: This helps to eliminate all the stains from the firearm. A brush is needed to apply the solvent. Solvents are the fluid used to remove carbon, lead and other pollutants that damage the gun over time.
  • Cleaning Rod: This tool is used to tidy up the interior of the gun using many attachments. It is available in different sizes for different barrel sizes, calibers, and gauges. It is a strong, thin, long, and straight wand made up of metal, tough plastic, or carbon fiber which has one end for gripping and another end for attaching the accessories.
  • Brush and Swabs: A brush has many useful jobs to do, like removing dirt, residues, and fouling in the bore of the barrel. Different types of brushes are used to clean the parts of the gun like bore brushes, double end brushes, cleaning swabs, cleaning patches (cotton or wool mop), bore snake, etc. Each one has individual cleaning features.
  • Safety Gears: Safety gear is a must while cleaning your gun, but store-bought kits may not include this tool. Use safety gloves, proper protection for eyes, cloth, or paper to protect the ground you will work on.

Before you attempt to clean your gun. You should know how to dissemble it or put it back together to work correctly next time, and no accidents occur. Be sure that you work in a well-ventilated location.

How to Clean My Gun?

A good gun serves generations if maintained the right way. You’ll be surprised to know that most gun users prefer cleaning their guns either at the beginning or end of a session. No matter what activity you indulge in, gun cleaning practice is a must. And if you ask why?

The simple answer would be that firearms are practically built to last long and have quite a few safety features that keep us from accidents. Maintaining them well preserves their functionality and value and serves you the confidence of performance when needed.

Now, let’s get into what’s the right way and how often you should clean it.

Steps to Clean Your Gun the Right Way

Before we start with the steps, a word of advice would be: Even if you are cleaning your gun for the hundredth time, get some well-ventilated place for the job. A small, closed room may not be a great idea.

PSA Custom .30 Caliber Cleaning Kit - 10336
Check Prices

#1 Unload or Empty the Gun

It is essential that you take time and check and recheck while unloading your gun before cleaning. Ensure the gun doesn’t have a round ready to release and remove it from the barrel.

#2 Disassemble to Its Components

Unless you are a pro at this, definitely check the manual before disassembling the gun. For most break-action guns, you should have a forend, the action, and the barrel.

While for rifles and semi-automatic pistols, you’ll have the magazine, frame, guide rod, barrel, and slide. Remember, it’s not necessary to strip shotguns and revolvers to be cleaned.

#3 Wipe the Dirt Off

Now, get a clean and dry cloth or rag and wipe the gun and its components individually. You can use a cotton swab or toothpick to wipe away the debris from the hard-to-reach areas.

Parts like the trigger guard, alongside the ribs, and places around the ejectors need special attention as they may hold clotted grease, pine needles, etc.

#4 Clean the Barrel and Patches

Once you have cleaned most of the dirt away, move on to the barrel. Take a decent-sized cotton patch and soak it in bore solvent. Push the patch from one end and take it out from the other.

Remember not to pull it back as that may redeposit the dirt inside the barrel. Take a bore brush and run it two to three times inside the barrel. This will help loosen any debris.

Once done, put the solvent-soaked cotton back into the barrel, and run it through. Do this until the cotton comes out clean.

#5 Lubricate the Barrel

Get a small rag, spray some oil and wipe all the components to maintain the luster and shine. This will also help prevent rust, but remember only to use a few drops. For the barrel, take a cotton swab dipped in gun oil and run it through the inside for a light coating.

Keep your gun away in a well-ventilated area and let it rest and dry for a while.

#6 Reassemble and Perform A Functional Check

Every time we disassemble a gun and reassemble it, it is imperative to have a functional check to rule out accidental discharge risk. Do check if the slide operation, trigger mechanism, magazine retention, and ejection all work fine.

Hoppe's Wet Tin Cleaning Kit With Mops, Orange
Check Prices

During this complete disassembly process, cleaning and reassembly, never miss out on the gun safety rules.

How Often Should You Clean Your Gun?

Every time you use your gun, the ammunition cartridge fires up and ignites the gunpowder and leaves residue inside the barrel. Sometimes, there’s also a small amount of bullet metal that remains. This debris keeps adding and clogging the barrel, which can affect the gun’s reliability and accuracy.

So, ideally, no matter which firearm you use, it should be cleaned after every shooting session.

What Is A Gun Cleaning Solution?

A gun has different components which all work together for smooth and accurate functioning. It is needless to mention how important it is to clean your gun regularly, preferably after every session.

While the gun’s primary cleaning is pretty simple and does not require any expertise, it is always done better with the right equipment. One of which is the gun cleaning solution.

Gun cleaning solutions are specially formulated for deep cleaning most quickly and effectively. Not only that, but they also help protect the gun from rust and corrosion.

What Does A Gun Solvent or Cleaning Solution Do?

Just like gun oil has several merits and purposes to it, so do gun solvents. Gun solvents are basically chemical mixtures that are designed to optimally clean firearm barrels. It also cleans and protects the gun for rusting, residual fouling buildup, loosens, and dissolves any carbon fouling and more.

Gun cleaning solutions or solvents are often harsh chemical mixtures that are highly flammable. They mostly comprise ethylene glycol, potassium, ammonia, surfactants, kerosene, N-butyl ether, caustic soaps, etc.

The primary objective of gun cleaning solutions is to remove any metallic and powder fouling deposited on the barrel’s sides with repeated usage without cleaning.

When we use a gun, the internal components experience extreme heating, friction, and high-speed movement. This causes significant wear in the gun if not maintained regularly and can also hamper the accuracy and functioning.

How to Use A Gun Cleaning Solution?

Gun cleaning solutions are meant to be soaked for a while before they can start working on loosening and dissolving any carbon or metal remains.

Here’s a quick guide to using a gun cleaning solution the right way:

#1 Coating the Solution

The first and foremost is to find a clean bore patch and rod. Now soak the bore patch in the gun cleaning solution, and run the patch through the barrel, completely coating the inside with the solution.

#2 Let It Sit

Before we can proceed with the process, let the solution sit on the barrel for about 10 to 15 minutes. We let the solution soak because it allows them time for the solvent to soften the fouling material and debris to be cleaned easily later.

#3 Clean the Barrel

Remove the patch from the barrel from the other side and remember not to push it back inside again. This will then redeposit any dump that the patch has collected.

Then rerun a clean patch by pushing it from one side of the muzzle and taking it out from the other. Repeat the process until the patch comes out clean. You may use one patch for a maximum of twice.

#4 Recheck the Barrel

Even after cleaning it several times, if you still see any black or carbon debris on the patch, then we have another quick trick.

Take a brass brush, dip it in the gun cleaning solvent, push it into the barrel, and scrub it with a steady but light hand. Work the brush back and forth to clean out any stubborn remains from the inside.

Then, finish it with a clean patch again. Repeat the process if needed.

#5 Gun Oil Coating

Once you have cleaned it thoroughly, apply a light coat of gun oil to protect the bore. Only a drop or two with a cotton swab can do the magic. There you have a clean and shiny gun for your next session.

Buyer Guide To 0.224 Valkyrie Barrel

224 Valkyrie short barrel

The main reason why so many shooters are moving to .224 Valkyrie barrels is that it improves the shooting game to a great extent. Not only are they customizable, but also extremely easy to install.

Before we give away all our tips on buying the right Valkyrie barrel, let’s discuss a bit about barrels, why does the length matter, mainly the 224 Valkyrie offerings.

Why Does the Barrel Length Matter?

The simple answer would be that it improves accuracy. What a longer barrel length does is it extends the time the bullet takes to fire before a shot. The chamber pressure inside the barrel gets more time to act on the bullet, thereby increasing the exit velocity and the effective range of the bullet.

It is for the same reason that we say, the longer the barrel, the faster the velocity. So, say you are using a Valkyrie rifle for hunting or home defense; it makes sense to go for a shorter barrel. But if you plan to go for long-range shooting competitions, you definitely need a longer barrel for more accuracy and precision.

Does the Barrel Twist Ratio Affect the Accuracy of A .224 Valkyrie?

So, what is a barrel twist again?

The barrel twist is an extremely important factor to consider, and it represents the revolutions per inch. You will often notice number markings on your gun, like 1/7, 1/8, or even 1:6:5. This refers to the barrel twist ratio.

Say we consider the barrel twist ratio to be 1:8; this means there is one revolution per 8 inches. But what is the purpose of this?

American Eagle Valkyrie .224
American Eagle .224 Valkyrie 75gr TMJ Ammunition, 20 Rounds
Check Prices

The barrel twist ratio has a lot to do with the accuracy and stability of a round fired. The right twist ratio only makes the shot steadier. Depending on what bullet you intend to shoot, the barrel twist ratio can significantly increase the precision.

Now, finally, moving on to how to choose a .224 Valkyrie barrel?

.224 Valkyrie Barrel – Buyer Guide

Do we really need to stress the importance of what to look for in any product before investing in it? No, right. It’s always better to research a bit on the product so you can finally make an informed buy.

PSA 20" Rifle-Length .224 Valkyrie 1/6.5" Stainless Steel 15" Lightweight M-Lok Upper with BCG & CH
Check Prices

Take a look at the aspects you should consider in a .224 Valkyrie barrel.

Length

It is always better for the amateurs to start with an 18-inch barrel that works pretty well for short-range shooting, like hunting or home defense. But if you are a pro at this and want more accuracy on your target, a 24-inch barrel will work exceptionally well.

As we have mentioned earlier, the length of the barrel is prime when considering accuracy and velocity. The good thing with longer barrels is that you can use them for both short- and longer-range shooting, but a short barrel will not be fruitful for more than 500-600 yards. But, also keep in mind the storage when considering the length of barrels.

Barrel Twist

As you already know, the bullet twists before it finally comes out of the barrel and affects the overall accuracy of your shooting round. So, you should always look for a barrel that has a good twist ratio.

Hornady Match 88 gr ELD .224 Valkyrie Ammunition 20 Rounds
Check Prices

So, what ratio is a good twist ratio?

Here comes the concept of the bullet weight. The weight of a bullet will determine the correct twist ratio for a barrel. A .224 Valkyrie cartridge is about 63 grains in weight, so the ideal twist is 1:7. Remember, the higher the weight, the lesser the barrel twists.

Installation

When it comes to installing a Valkyrie barrel, always remember that it’s never too late to call a professional. Although most of them are pretty easy to install, you can always take professional help if you are not sure of the procedure.

Sturdiness

No matter which bullets you use, the barrel has to be sturdy and robust. This is a no-brainer, as you know that the bullet heats up in the barrel and gains its momentum for a shot. You do not want to compromise on the quality here. Always look for titanium or aluminum alloys.

Frequently Asked Questions (FAQs)

Is a .224 Valkyrie cartridge even good, or is it just hype?

.224 Valkyrie is a predator-hunting cartridge. It is unbelievably one of the fastest expanding bullets, which delivers an unmatched amount of energy to the game.

Can you shoot 224 Valkyrie in a .223 barrel?

Obviously, the gun barrel is much sturdier than the bullet itself, so a .224 Valkyrie bullet will easily pass a .223 Remington barrel.

Can you shoot 223 in a 224 Valkyrie barrel?

.223 Remington uses the same .224 diameter bullet, so it can easily pass through a .224 Valkyrie barrel.

What is the difference between a .223 and .224 Valkyrie cartridge?

The main difference is in the weight of the bullet. The .224 Valkyrie is about 60-90 grains, whereas the .223 Valkyrie is 35-80 grains.

Also, the case length and rim differ for the two, apart from the fact that a .224 Valkyrie maintains a supersonic speed beyond 1300 yards, whereas the .223 does not.

Why Choose A .224 Valkyrie Barrel?

There is so much hype about the .224 Valkyrie barrel for the only sole reason that we, humankind, thrive towards better precision, speed, and range.

To give you an insight, a .224 Valkyrie barrel was initially designed by the Federal Ammunition in 2017. Before the .224 Valkyrie cartridge was out in the market, the long-range shooting was mostly dominated by the large framed assault rifles or large caliber bolt rifles.

But what set the .224 Valkyrie cartridge apart was its high ballistic coefficient and velocity. It is sometimes even compared to the mighty 6.5 Creedmoor. The main reason why the Federal Ammunition decided to work on .224 Valkyrie is to bridge the gap in the MSR 15 platform.

There are several cartridges that work exceptionally well but to a certain distance, i.e., up to 600 or 700 yards. So, it automatically does not maintain a supersonic speed which is primary for the accuracy and precision of a shot.

Barrel Twist of A .224 Valkyrie

You may have heard of barrel twist and its significance in delivering accurate and precise shots. To refresh it for you, the barrel twist is nothing but revolutions per inch in a barrel.

The barrel twist ratio is greatly affected by the weight of a bullet. So, in case you are using a .224 Valkyrie cartridge, the ideal twist ratio will be 1:7, given that the bullet weight is approximately 63 grains.

Why Should You Choose A .224 Valkyrie Barrel?

We agree that there are numerous undeniably good cartridges, barrels in the market. If we consider the .223 Remington, it is an extremely well-designed cartridge that falls short of the .224 Valkyrie only in a few aspects.

The .224 Valkyrie is undoubtedly handmade for the extreme long-range shooting sessions. The other cartridges are definitely more reasonably priced and of good quality.

But what makes the .224 Valkyrie stand out is that the .224 Valkyrie bullets are long and slippery in design, which means they will be able to carry more velocity than a heavier 70-90 grains bullet. This directly affects the intensity of the bullet on the target.

The other reason is that the .224 Valkyrie can drift a little less crosswind, shoots a bit flatter, which means it will drop lesser and remain unaffected by the wind.

The most significant reason still remains that a .224 Valkyrie can remain supersonic up to 1300 yards offering utmost precision and accuracy to a shot.

That being said, the .224 Valkyrie can also use 90gr Fusion and 78gr TSX bullets almost effortlessly. So, if you are a long-range shooter, the .224 Valkyrie is a definite go for you.

Final Thoughts

The main reason to make .224 Valkyrie was to bridge the gap in the MSR 15 platform. Most of the cartridges like 223, 22 Nosler, 556 can work well for 600 to 700 yards. But it is essential for a bullet to maintain supersonic speed to keep the accuracy and precision in place.

We hope the article was informative. Here are some of the best .224 Valkyrie barrels, the BSF 20″.224 Valkyrie 1:7 Twist, the Radical Firearms – 22″, and the Brownells AR-15 Barrels .224 Valkyrie Stainless Steel.

History of the G3 Rifle

Introduction to the G3 Rifle

While the HKG3 isn’t as widely known as the AK-47, it still holds a historical significance. It was used in the Second World War and is still used by numerous countries.

But if you’re looking to get your hands on one, learning what the weapon is like before spending any money on it is a good idea.

In this post, I will briefly review the G3 Rifle and discuss its interesting history.

G3 Rifle Review

Like most German products, the HKG3 boasts an outstanding design, and its superb execution makes it all the more impressive.

In addition to being utterly reliable and reasonably portable, the weapon also offers target accuracy.

There’s very little to criticize about the G3. The only gripe some have with it is that it’s relatively less potent than other 7.62 NATO guns out there.

However, it’s also important to consider that the appeal of lighter, easier-to-carry weapons has worn out over the years. While having a featherweight 7.62 weapon does hold its appeal for some, most want to get their hands on a more powerful rifle regardless of if they’re new to guns or trained experts.

History of the G3 Rifle

In 1948, four years after the Second World War had ended, three engineers from Mauser opened up a machine tool plant at their old site. They salvaged what they could and began to manufacture everything from sewing machine parts to bicycles.

The things they had salvaged from the former Mauser plant made manufacturing a little easier to get into.

About a year later, the three registered a company in their name – Heckler & Koch.

Around the same time, West Germany had put out a bid request for a new rifle for its army. H&K stepped up to the occasion and created their version of the Spanish CETME rifle.

It was a delayed-roller-blowback gun, which made it a lot lighter than gas-operated weapons. However, the gun had a problem – the cases would stick inside the chambers and tear off the extractors.

After finding out about the issue, the government of West Germany requested that a new rifle be chambered. But this time, they wanted it to work with the NATO round.

Heckler & Koch’s second gun was called the Model B and used the NATO round. Additional improvements were made to the design, enabling users to fire from a closed bolt in both semi-automatic and fully-automatic modes.

22 mm grenade - Wikipedia

The Model B featured a longer barrel and had a 22mm grenade launcher guide. It also comprised a perforated sheet metal fore-end, enabling the barrel to cool faster.

Early Samples

It didn’t take long for the Model B to gain popularity. However, West Germany wanted the rifles to be manufactured in Germany.

Negotiating with H&K took quite a while; however, the manufacturing rights for the G3 (Gewehr 3) were eventually awarded to H&K. Another West German contractor, Rheinmetall, was also given manufacturing rights; however, the contractor gave up the rights in 1969.

The earliest production samples came with a flip-up rear sight that had two apertures. It also had a wooden butt-stock and a folding bipod.

Later, the flip-up sight was replaced with a rotating diopter sight. The new sight had a V-notch zeroed with ball ammo to 100 meters. There were three more apertures incorporated, zeroed to 200, 300, and 400 meters, respectively.

In the next version, the wooden stock was replaced with a more ergonomic polymer stock, and this is the version that would eventually become the G3A3.

While the G3A4 only featured minor improvements, its next version featured a removable bipod and a heat shield in the barrel channel.

The superb construction of the G3 made is extremely popular, primarily because it made it that much more reliable. Some even say that the dirtier the G3 got, the more reliable it became.

Usage

The G3 rifle was eventually adopted by more than 40 countries in all parts of the world, from Afghanistan to South Africa. Many countries also licensed and manufactured their own variants of the rifle for use by their military.

The rifle is still in use today in numerous countries.

Features

The G3 is modular – the butt-stock, grip, and fore-stock can be changed in a variety of ways with ease. The components are held in place by simple push-pins, allowing the user to replace the parts quickly, even when they’re on the move.

Rra Rrage 3g Rifle 5.56mm Nato - 6 Pos Stk 16" 1:9 30rd Black
Check Prices

One of the best things about the rifle is that it uses easy-to-find, cost-saving steel components in favor of precision-machined parts. If the gun suffers damage, repairing it is easy.

However, if a G3 is severely dented on the field, it can suffer from impairment of internal parts, causing reliability problems. While heavy denting cannot be fixed on the field, specially designed mandrels can quickly fix the issue.

Trigger

The G3’s trigger mechanism features a three-position fire selector switch. You can toggle between its two fire modes – single-fire and automatic fire by sliding the safety toggle to “E” and “F” respectively.

The third fire mode is the safety mode, and the trigger is mechanically disabled.


Check Prices

As mentioned earlier, the G3 is a modular rifle, and it is possible for a user to fit a four-position fire selector group, which includes an ambidextrous lever.

The fourth selector setting enables a three-round burst fire mode, making the G3 a lot more versatile than it originally was.

Accessories

The G3 comes with a standard set of accessories that include a detachable bipod, a sling, a speed-loading device, and a cleaning kit.

Several different styles of bayonet are available for purchase for the G3; however, most models require you to fit an adapter into the end of the cocking tube.

Additionally, one can also mount a 40mm HK79 to the G3, which is an under-barrel grenade launcher.

Some other accessories available for the G3 include a firing adapter, a straight blowback bolt, and a conversion kit for training purposes.

Sound suppressors are also available for the G3, making it one of the lightest and most versatile weapons ever produced.

22 Centerfires for Deer Hunting

It seems there has always been, and probably always will be, a debate as to whether or not 22 caliber center fire cartridges are adequate as “deer” rounds. With the recent introduction of new bullets, ammunition and cartridges the issue is getting more and more attention. In the state of Texas 22 center fire cartridges are legal for hunting deer. The TP&W Outdoor Annual states under the “Means and Methods” section concerning firearms: Game animals and game birds may be hunted with any legal firearm, EXCEPT: white-tailed deer, mule deer, desert bighorn sheep, and pronghorn antelope may NOT be hunted with rim-fire ammunition of any caliber. Personally I believe anyone hunting deer or similar game with a rim-fire round should be beaten thoroughly and have their trigger finger chopped off at the knuckle. There is no excuse for this highly unethical practice in today’s hunting environment. Outside of the center fire rounds being legal there is also the issue of these rounds being ethical. I believe they are within their limitations. Cartridges such as the 223 Remington, 22 –250 Remington, 220 Swift and the new 223 WSSM (Winchester Super Short Magnum), commonly thought of as varmint rounds, can quickly and humanly take deer. Provided the hunter is willing to be patient and accurately place his or her shot.

Winchester and Federal are currently cataloging 22 caliber rounds marketed as suitable for light thin-skinned game. Winchester has two offerings one in 223 Remington and the other in 223 WSSM. Both loads share the same bullet, a 64-grain Super-X Power Point (SX-PP). Winchester even has a picture of a deer on the end of the box of these loads. Speer’s 55-grain Trophy Bonded Bear Claw (TBBC) is the bullet Federal uses in its loads for this category. One in 223 Remington as well as one in 22-250 Remington. I did check the Remington catalog, but found no loadings being marketed as “deer” rounds in any of their 22 caliber center fire offerings. I also didn’t find any loading for the 220 Swift by any manufacturer being recommended as a “deer” load. The bullets mentioned above in the Winchester and Federal factory loads are also available for hand loading. Another 22-caliber “hunting “ bullet is the 60-grain Partition from Nosler. I was curious to see how these cartridges stacked up on paper to the more traditional rounds commonly thought of as suitable for deer. The results can be seen in the following chart.

Cartridge DescriptionMuzzle (fps)/(ft lbs)100 (yards)200 (yards) 300 (yards)
Winchester, 223 Rem 64-gr SX-PP3090/13572684/10242312/7601971/552
Winchester, 223 WSSM 64-gr SX-PP3600/18413144/14042732/10612356/789
Federal, 223 Rem 55-gr TBBC3100/11752630/8452210/5951830/410
Federal, 22-250 Rem 55-gr TBBC3600/15853080/11552610/8352190/590
Remington, 22-250 Rem 55-gr PSP*3680/16543137/12012656/8612222/603
220 Swift 55-gr **3900/18573469/14693079/11572721/904
Winchester, 270 Win 130-gr3050/26852828/23092618/19782416/1685
Federal, 7mm-08 Rem 140-gr2800/24402610/21352430/18402260/1590
30-06 Springfield 165-gr ***2800/28722579/24632367/20532167/1720
  • * Load is shown for data purposes only. Remington makes no recommendation of this being a “deer” load.
  • ** Personal hand load I use in my 220 Swift.
  • *** Personal hand load I use in my 30-06 Springfield.

All cartridges have certain limitations and the 22 center-fires are no exception. Even with the factory ammunition and bullets of more robust construction and slightly heavier weights in some cases. These rounds still lack some of the aspects more traditional cartridges have always had. The obvious is caliber. Which lacks frontal diameter and weight. The frontal diameter being small means, even if the bullet performs well and mushrooms properly wound channels will likely be small. Being lighter weight these bullets will have less momentum to penetrate thru bone and less likely to give a reliable exit on less than favorable angles thru the body. Another disadvantage to lightweight bullets is their inability to retain energy over long distances. Even with the high muzzle velocities energy drops off significantly after 100 yards. Another factor to consider is lightweight bullets are also more subject to the effects of wind, rain, and other in field elements. This reduces the effective range of what was a 300-400 yard coyote rifle to around 100-200 yard maximum hunting rifle requiring critical shot placement. With all these factors stacked against these little cartridges. Why would anyone consider them for hunting deer? Some are drawn to a challenge, but I think it’s mainly because these cartridges are generally accurate and felt recoil is very light. We’ve all seen hunters using larger rounds and “jerking” the trigger or “flinching” in anticipation of the recoil. I believe a person should hunt with a gun they can shoot accurately and put power second, given the cartridge is adequate for the game they are hunting and the situation. One well-placed shot is far better than five or six poorly placed ones. I’ve said many times all the power in the world is wasted if not placed properly.

spring turkey from Texas - Guy Lockhart

Theories and on-paper ballistics of 22 CF rounds are good for discussion purposes, but what really counts is how they perform in the field. I’ve used my 220 Swift to take a number of white-tailed doe. The breaking of dawn one particularly cold December morning in the 2002-2003 hunting season found me seated in box blind waiting for an opportunity to fill a doe tag. As light began to gradually filter over the frost covered grass and sparse Mesquite bushes I saw 3 white-tailed doe moving through the cover. I picked out the largest of the 3 and began to wait for right opportunity for a shot at her. She was standing face on about 70 yards away with her head up. I settled the cross hairs of the scope just below the white on her neck and began to squeeze the trigger. A sudden flash of orange and it was all over. She collapsed in the grass and never moved. Upon inspection, I found several of the vertebrae in her neck had been destroyed and the major arteries had been ruptured. About a month later while hunting wild hogs in east Texas. I decided to try for a hog with my Kimber 84M Varmint in 22-250 Remington. Just before dark, perched in a blind overlooking a field adjacent to big bottom. I saw several hogs enter the field from the thick cover about 200 yards from me. One was a nice sow around 200 lbs or so. I watched her for several minuets as she was feeding and moving up the hill towards me. Once she had worked her way within about 100 yards. I shouldered my rifle and prepared to take a shot. I watched her through the scope until she put her head down to feed. She never heard the report of the rifle as the little bullet struck her between the eyes, killing her before “quick” could get started. Wild hogs are some of the hardest animals to bring down cleanly. I’ve taken a number of them with my 22-250’s, all head and neck shots I might add, and have yet to have one take a step. My good friend and hunting partner “Wild Bill” used his DPMS Panther Extreme Super Bull in 223 Remington to cleanly take a large doe on one our hunting trips. The doe was 85 yards from him as he touched off the shot. He placed the shot through her chest. Upon entry the bullet stuck the shoulder blade, which is not what you want, but it still broke into the chest cavity. Proving that these little bullets have more penetration capabilities than I originally gave them credit for having. The doe staggered a short distance and fell. When we field dressed her the damage done to the vital organs far surpassed what is commonly found with much larger rounds like the 270 Winchester or 30-06 Springfield.

I’m not trying to recommend everyone run out and start using one of these 22 rounds for their uses, quite the contrary, only to realize the effectiveness of these cartridges when properly used and the challenge of hunting with them. Hunter’s are always looking for challenges, which is why the number of Archery and Handgun hunters is on the rise. Hunting with a 22 center-fire challenges hunters to make precise shot placements and to be honest with themselves and their abilities. Also being aware of the bullets construction and how that bullet will perform on game. This means waiting for the right opportunity or passing the shot all together. Things we should all do regardless of what we choose as a hunting tool.

Guns for Turkeys

The smell of spring is in the air, and this means Spring Turkey season!  The sound of an old Tom gobbling from the roost just before day light can really get your blood pumping.  If you have never experienced hunting wild turkeys you owe it to yourself to give it a try at your earliest opportunity.  The wild turkey is a beautiful and challenging animal to hunt.  Not because he’s the smartest thing in the woods, after all there is not a lot room in that little head for a brain, but turkeys have learned that just about everything else in the woods is after them.

So when those sharp eyes see something out of the ordinary, turkeys head for the nearest exit in a hurry.  God only knows which direction this will be!  The turkey’s eyesight is as sharp as a hawk’s to say the least and this is one time where camouflage, any and everything, is a definite must.  Seeing a big Tom in full strut with his wings cupped, feathers all puffed up and tail in full fan is one sight I would not trade for regardless.  The colors of the Rio Grande turkeys, like we have here in Texas, are so striking in the spring they make the birds seem almost unreal.  There are various ways to harvest a bird, shotguns seem to be the most popular however some hunters may prefer a rife and let’s not forget an accurate handgun.

With all the camouflage clothes, face nets, gloves, calls, and decoys you are likely to feel more like a special forces solider than a turkey hunter, this why when choosing a firearm I like to keep it as simple as possible.  In a shotgun any action or model will work just fine and the best all around for turkeys is a 12-gauge, in my opinion.  The 12-gauge has a number of loads to choose from and recoil is tolerable.  The best load, as far as I’m concerned, is a 3” in 4, 5 or 6 shot with 1-¾ oz to 2 oz of shot.  Personally I like the Winchester Supreme Turkey loads with 1-¾ oz of #5 shot.  This load provides good pattern density from my gun out to 30-40 yards.

Shotgun for Turkey Hunting

My pick for a shotgun is a Remington 870 pump-action 12-gauge, 3” chamber with a 21” vent-rib barrel and an extra-full choke.  The gun is lightweight and the shorter barrel means it’s easy to maneuver in cover as well as being fully camouflaged it wears a fiber optic front sight.  I can’t really say the gun being all camo will help kill more turkeys but it looks cool and the main advantage I see is no glare and it does blend in to the cover well.  If you are thinking of using a rifle or handgun to hunt turkey, check your states laws, some states do not allow turkeys to be hunted with any firearm other than a shotgun.  For those states that do allow rifles and/or handguns, there are a number different rim-fire and center-fire cartridges that will do the trick.

My guess is that if you were to look-up “hunting challenge” in the dictionary it would say; try hunting wild turkeys with a handgun, and this is defiantly true.  Chasing after turkeys with a handgun offers its own set of obstacles only a true hand gunner is willing to under take.  Whether you prefer a single-shot pistol or a revolver the name of the game here is patience and above all, shot placement.

Single shot pistols

Single shot pistols such as the T/C Contender or Encore as well as a bolt-action cambered in cartridges such as the 22 Hornet, 221 Fireball, or 223 Remington make fine choices for wild turkey.  When fitted with a quality variable scope these guns are capable of making shots well beyond 100 yards realistic.  The two scopes I like the best are the Leupold 2.5×8 EER and the Burris 3×12 LER.  The high-end magnification of these scopes is a welcome advantage on longer shots.  Match grade or FMJ bullets make good choices for the rounds, but the best load is the one your gun will shoot the most accurate.

Revolvers for Hunting turkeys

Hunting turkeys with a revolver may seem to be the equivalent of charging the gates of hell with a squirt gun, but even that it not impossible if you have faith.  Neither is taking an old Tom with a revolver if you are ready.  Cartridges like the 32 H&R Magnum, 357 magnum, and 41 and 44 Remington Magnums offer the accuracy and plenty of power for a tough gobbler.  The 41 Remington Magnum, or the 44 Remington Magnum may seem like over kill to some people, but I have always said it is wise to beware of any creature who’s eyes and genitals are bigger than it’s brain.  Seriously though, when these rounds are properly loaded they are just as suited for old Tom, as they are that big buck.  A scope is a must and I would consider a 4x the minimum magnification for hunting turkeys.  The Leupold 2.5×8 EER mentioned earlier as well as the Burris 2×7 or the 4x Leupold EER all make fine choices for a scope on a turkey revolver.  In my Smith & Wesson 657, the load I use for turkeys is a Hornady 210-grain XTP hollow-point crimped in place over 7.5-grains of Hodgdon Tite-Group powder.  This load produces about 1100 fps from the 7 ½” barrel and is quite accurate at 50-yards.  Tite-Group is a dirty powder but it produces the accuracy I’m looking for in my 41 magnum.  In the 44 magnum a 200 to 240-grain bullet at around the same velocity is all that is needed.  One of my best loads for the 44 magnum is a 240-grain Hornady XTP pushed along at about 1150 fps with mild dose of AA #7.  Both of these loads are accurate and are pleasant to shoot.

Turkey’s are pretty tough old birds and shot placement is the key no matter what you use for a hunting tool.  The head and neck area are the most venerable area on a turkey.  This is definitely the place to put the density of a shotguns pattern.  This also the best shot placement for a rifle or single shot pistol.  It provides a quick instant kill and does not ruin any of the breast meat.  The area where the feathers meet the head/neck is the spot.  If a revolver is your chosen tool then the precise bullet placement required for a head/neck shot may not be obtainable due a number of factors.  In this case the shot can be placed through the wing into the area at the top of the leg.  This shot can be taken even if the turkey is in full or half strut. This shot takes the vitals and legs, and most important you will not lose any of the precious breast meat.  A little more risky spot is where the wings come to a point on the turkey’s back this requires the hunter to wait for the time when the bird is upright to avoid the chance of the bullet passing through the breast.

Hunting wild turkeys requires determination, patience, and in my case, a lot of luck.  Just when I thing I have it all figured out, well, I don’t.  Either way the spring is a great time hunt wild turkeys.  Enjoying the spring weather and having fun is what it’s all about.

Winchester’s Supreme Ammo for Handgun Hunters

Ask any self respecting handgun hunter about using factory ammunition and you’ll probably get one of those raised eyebrow “you’re not exactly right are you” sort of looks, and for good reason. Three aspects we handgun hunters must have in our hunting ammunition are power, consistency, and a reliably performing bullet. Factory ammunition has earned the reputation of being a sub-par performer in these areas, the main reasons we tend to turn our noses’ up at the mention of using factory ammunition. Some companies “hunting” ammunition is nothing more than their existing personal-protection ammo packaged with a new label marketed towards hunting.

Fortunately this in not always the case, many companies have made an effort to produce ammunition worthy of meeting a serious handgun hunters standards. One in particular is Winchester (www.winchester.com). Winchester’s Supreme line of handgun ammunition is offered in a number of fine hunting cartridges that include the 357 Magnum, 41 and 44 Remington Magnums, 45 Winchester Magnum, and the awesome 454 Casull. All of these rounds are loaded with either Winchester’s new Platinum Tip Hollow Point or Partition Gold bullet. Specifications for each round can be seen in the following chart:

Cartridge Description           BulletMuzzle (fps)/(ft lbs)50 (yards)100 (yards)
357 Magnum180-grain PG1180/5571088/4731020/416
41 Remington Magnum240-grain PT-HP1250/8831151/7061075/616
44 Remington Magnum250-grain PG1230/8401132/7111057/620
44 Remington Magnum250-grain PT-HP1250/8761148/7321070/635
454 Casull260-grain PG1800/18711605/14881427/1176
454 Casull260-grain PT-HP1800/18701596/14701414/1154
45 Winchester Magnum260-grain PG1200/8321105/7051033/617
  • PG= Partition Gold
  • PT-HP=Platinum Tip Hollow Point

Recently I have had the opportunity to test this ammunition with the Platinum Tip in 41 and 44 Magnum as well as the Partition Gold in 44 Magnum. Both of these rounds were tested from 7 ½” revolvers. The 41 magnum from my Smith & Wesson 657 with a 4x scope and the 44 magnum from my Ruger Super Blackhawk Hunter wearing a 2x scope, both scopes were Leupold EER Another round included in these test is the 45-70 Government. The old 45-70 is one of my favorite rounds for hunting and like many hunters I’ve always felt you needed to hand load it to obtain it’s full potential, especially from a handgun. So I was very curious to see how the 300-grain Winchester Super-X Hollow Points and Partition Gold loads would perform out of my 14” SSK Contender. The range results can be seen in the following chart:

Cartridge Description           Bullet 50 (yards) 100 (yards)
41 Remington Magnum240-grain PT-HP2.38”3.09”
44 Remington Magnum250-grain PG3.47”4.52”
44 Remington Magnum250-grain PT-HP2.77”4.27”
45-70 Govt300-grain Super-X HP1.64”2.84”
45-70 Govt300-grain PG2.39”2.84”
  • All groups were fired from a sandbag rest consisting of 5 shot groups for the 41 and 44 and 3 shot groups for the 45-70.
  • PG= Partition Gold
  • PT-HP=Platinum Tip Hollow Point

The Platinum Tip Hollow Point is a premium bullet with several features to make it a reliable performer on game animals. A patented jacket with lead notches around the mouth of the 2 part hollow point means this bullet will provide controlled expansion at all ranges, but wait it gets even better. The jacket has a reverse taper to lock the bullets core. All of the features combine to give the hunter a bullet with large frontal expansion along with adequate weight retention. This bullet is offered in the 41 and 44 Remington Magnum, as well as the 454 Casull. The Partition Gold ammunition is offered in 357 Magnum, 44 Remington Magnum, 454 Casull, and the 45 Winchester Magnum. The Partition Gold bullet is of a traditional partition design. The front section provides controlled expansion with the rear section bound by the partition and jacket. Giving this bullet maximum weight retention and penetration capabilities.

Historically one of the major problems with jacked handgun bullets is the separation of the jacket from the bullets core. This result in the bullets inability to retain its weight hindering penetration and in most cases the lack of a large exit wound. With all of the features of the Platinum Tip and Partition Gold bullets I was particularly interested to see how they would hold together upon impacting heavy bone. To simulate this I took a heavy piece of carpet and laid it over a ¾” piece of plywood and then placed this over a 55-gallon barrel filled with water. (Note: I conducted these tests at my personal range under controlled conditions and do not recommend you attempt to duplicate them.) Then using both loads in the 44 Magnum fired several rounds of each load into the barrel. Both bullets lived up to their billing and passed with flying colors. The Platinum Tip showed no hint of jacket/core separation and expanded to a very large average frontal diameter of .798”, weight retention averaged an impressive 244.2-grains. The Partition Gold performed as expected. The front section expanded, dare I say perfectly, even upon impact with the thick plywood retaining all of the “petals” around the hollow point with an average weight of 214.6-grains. This lower retained weight compared to the Platinum Tip is due to the front sections loss of the core, but the partition design held the rear section in place. Even with the loss of weight I still think the Partition Gold will penetrate better on larger game because it more controlled expansion.

After seeing the accuracy these loads produced at the range and how the bullets performed I can’t help but be excited about hunting with them during the upcoming hunting season. Winchester markets these rounds as suitable for thin-skinned game such as White-tailed deer and wild hogs and I believe they are right on with this recommendation. The quicker expansion of the Platinum Tip should make it the ideal choice for White-tailed deer, wild hogs up to 200 pounds or so, and any other game with thin skin and light skeletal structure. On game such as trophy size White-tailed deer and truly large wild boar where penetration becomes more important the Partition Gold is the one to have in your handgun’s chamber

Other Ammo you may be interested in